Background
This knowledge base article provides a step-by-step guide on how to create users in User Access.
Before You Begin
- Ensure you have access to the User Access Application. If you don't see User Access Application in your available Elda (Chrome) shortcuts, you may need to request access to it. Please see our article on how to Request access to an Elda Application.
- Ensure you are logged into the Elda(Chrome) User Access Application. See our article Getting Started with User Access for more.
- Ensure you have created the user in your Organisations' Active Directory. This will ensure that the user is assigned with Jobs.
Steps to Follow
- In the User Access Applications' main window, click on the Create User button. This will open up the Create User Window.
- Enter the new user's UserName and Password.
- Enter the new user's UserName (For this example we will use ElvindA as the username). The user name follows the format used by your organization. (For this example we have used [ First Letter in Upper case and the rest in Lower case of your Firstname] + [First letter of your lastname].)
- Enter the new user's Initial Password and can confirm the password for added security by typing in the same password next to the Confirm Password section.
- Click on the Save button.
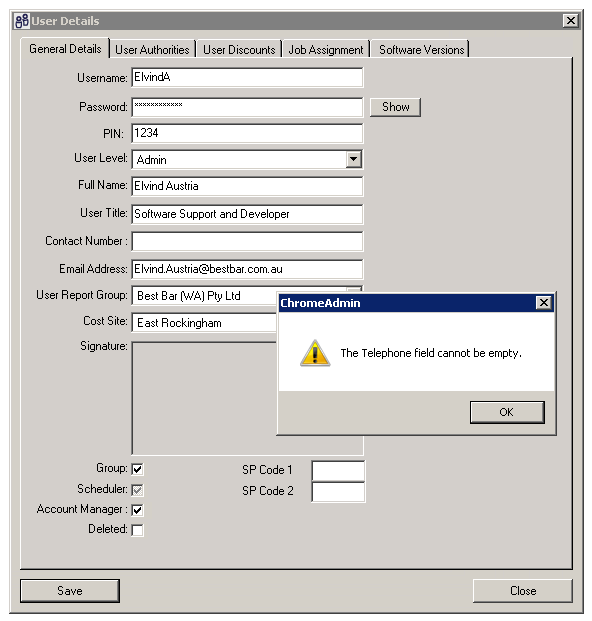
- A new window will pop-up where you will need to fill-up the user details. All the highlighted fields below are MANDATORY (cannot be blank). Once all the details have been filled, click Save.
Sample complete user details:
Sample error message that you'll encounter if you save without completing all the required details:
- The next step will be to copy the permissions from a select user to the new user. Please see our article on how to Set Up User Permissions for Elda (Chrome) using User Access.
- To update an existing user details, please see our article on how to Update User Details in Elda (Chrome) using User Access.


Charuka Egodapitiya
Comments