- Overview
- Changing the schedule/Manifest view
- Modifying Bar Production Rules
- Reassigning work to different production areas
- Creating a cut sheet - Off-Coil devices
- Creating a cut sheet - Shear Type devices
- Maintaining Device Bays
- Adjusting offcut and stock on hand quantities
Overview
The Cut Optimising application is a tool to assist in production planning. It allows a user to see easily what production is due for delivery as well as determine how each of the production area is loaded to do the required work and assist production management in load balancing.
It also features a facility to optimise cutting given the amount of stock on hand and what is required to be produced.
Access to the cut optimising application is controlled by user access. Ensure you have access to the application before trying to access it.
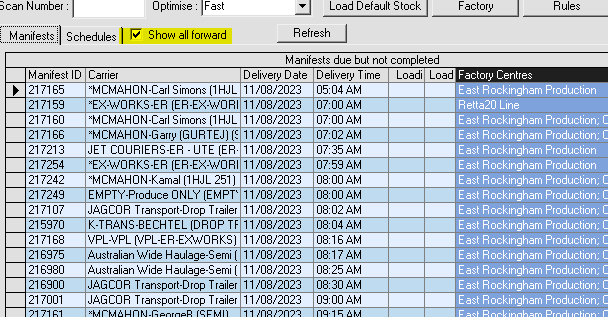
By default the application will display all deliveries occurring within the next 4 days. AN option is provided to display all manifests and schedules forward if required.
Displays are provided by manifest view or schedule view and are accessed using the tabs on the summary display. Data can be sorted by clicking the column header.
Individual panels within the application can be resized by using the drag handles provided between each grid. Hover the mouse on the dividing line until the mouse pointer turns into an east/west or north/south sizing arrow, then click the left mouse button and drag to resize the grid.
For details of operations of the software click the required link:
Changing the schedule/Manifest view
By default, manifests will show manifests that are due to go out within the next 2 days.
Checking "Show all forward" will display all incomplete manifests within the system.
By default all outstanding schedules are available within the Schedule Tab. Checking the "Not Filtered" check box enables you to view schedules that are due for delivery on a given date.
As mentioned, the grids can be sorted by clicking the required column header, so to view all deliveries scheduled for customer "Jagcor", first sort the deliveries by clicking the "Customer" Column header, then scroll down to find the required customer.
Finally, select all the deliveries by clicking the first row button for JagCor, holding down the shift key and pressing the last row button for JagCor.
The status column is a visual representation of the contents production states and loading states of the items on the schedule.
Details of what the status indicators mean can be found by clicking the "Status" column header. This column cannot be sorted.
With the customer schedules selected, an analysis of the tags can be performed for details of weights and at what stage production is at:
The production lines grid has 2 selector buttons on it.
The button with 2 dots on it will re-apply production rules for the selected items and display the production breakdown. Use this button if you have changed the production rules and wish to re-apply them to the selected schedules.
The button with 3 dots will simply analyse the selected schedules. This button should be used more often than the other.
In this example, the Shearline 300 has 158 tonnes allocated to it for this customer (spread over 30 days so not really an issue)
To determine what products are being produced through this line, click the Shearline 500 Row in the production Line Grid. Output of the analysis will be displayed in the "Products" grid:
To view how the N28 is being processed, select the N28 record in the Products grid:
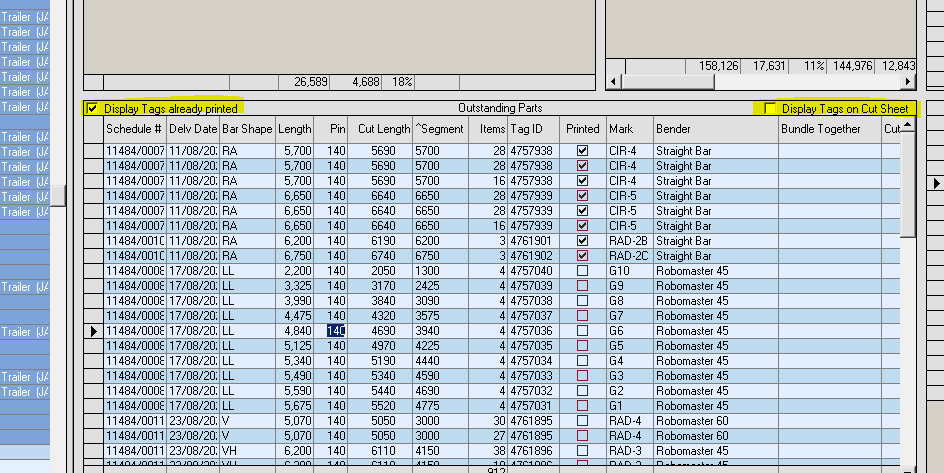
By default , the system will hide items that have already been assigned to cutsheets and have had their tags printed (Effectively ruled "Out of Bounds" for further production planning modification).These can however be viewed by checking the "Display Tags already printed" or "Display Tags on Cut Sheet" check boxes.
Work can be moved between Shear lines and Benders by selecting the required rows and right clicking the selection:
This does not alter the production rule and is considered a "temporary" fix. To permantly update the allocation for future items, the product rule for the item must be updated.
The bender summary for the selected lines displays how work will be processed on different benders if required.
To shift work from one bender to another, the Bender can be selected, then right clicking the selection. Use the "Move work to other machine" option to use an automated re-allocator to another bender:
Work can be moved by number of work pieces or weight as required. The "Calculate" button will display a suggestion of how the work can be moved to a different device. Pressing "Apply Results" will shift the work for the selected items.
Automatic allocation depends on how the device rule has been set up, if only one bender has been assigned to the production rule, no allocation will be performed.
If multiple benders have been assigned to the rule, allocations will be suggested.
In the above example, Not all pieces could be moved. If we look at the rule for N28 VH of Length 6110, only an option for the Robomaster 45 and RoboMaster 60 have been set up in the production rule.
- Click "Rules"at top of Cut Optimiser
- Select N28 Product
- Filter by Shapecode "VH".
Click Update Reprocess Devices. A grid will appear allowing you to over-ride which reprocess devices can be used for this rule.
If we re-add the Robomaster 60 and Robomaster 45 in addition to the OHMS Manual Bender, that will make this device available in the automatic re-allocation.
If we now re-run the device re-assignment, all work will be re-allocated between the Robomaster 60 and OHMS Bender:
Further, it is possible to limit the amount of work transferred to one device by adding a value to the Max cell for any device.
Press the "Apply Results" to save the work move results.
Modifying Bar Production Rules
Bar Production rules allow the system to allocate work off to the various work centres in a semi-automatic mode.
Rules are classified by bar products and shapes with an allowance for lengths of individual measurements within the shape.
To access the production rules press the "Rules" button at the top of the Cut Optimiser application:
This in turn will display the Rules maintenance form:
Rules can be filtered using various controls above the rule grid. Columns within the grid may be sorted by clicking the column header.
Below is an example of rules for an L-Shape N12 rebar:
Looking at the first rule we can deduce the following:
If an N12 bar with a shape of L with a length between 0 and 1500mm is processed. It will be sent by default to the Format14. If the Format14 is offline it will be sent to the Schnell OC 6m. Once either of the devices has processed the bar, no further processing is required in terms of cutting and bending.
The job will take 7 minutes to setup and 7 minutes to bundle up at the conclusion. Every 50 bars produced, the setup will need to be repeated. Items are to be bundled with no more than 1.2 tonnes weight.
First piece approval is relavant for 50000 pieces and a QA test should be performed every 50000 pieces.
Looking at a different example for a LL bar of N24:
For an N24 bar of shape LL between 2 and 12 metres length:
- The bar will be cut on the Shearline 300. If the Shearline 300 is off-line it will be sent to the Mini-Shear.
- After cutting, the bar will be sent to the Robomaster 45 for bending. If this is not available it will cascade to the Robomaster 60.
- Bundle in no more than 35 bars or 1.2 tonnes whichever is lower.
- 7 Minutes setup, 7 minutes teardown, 0.5 minutes per item, repeat setup every 50 bars.
Reassigning work to different production areas
See main article under Work-Load assignment with Cut Optimiser
Creating a cut sheet - Off-Coil devices
Creating a cut sheet - Shear Type devices
Maintaining Device Bays
From the Cut Optimiser main screen select the shear that you want to modify the bays for.
If the device is not visible in the grid check the "All" check box to display all devices available.
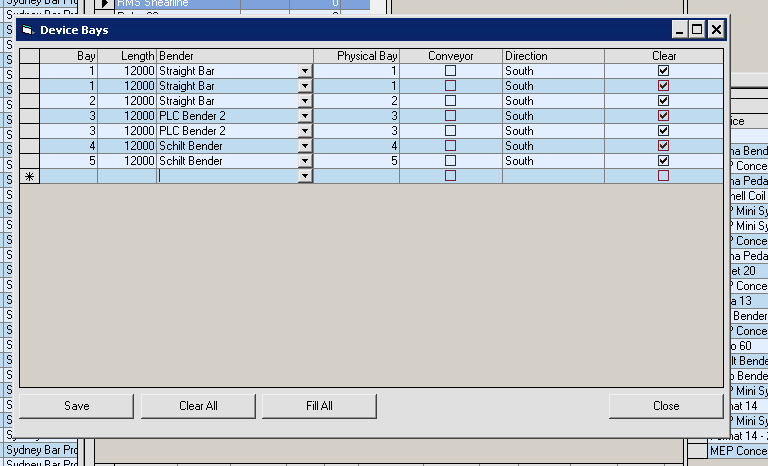
Press the "Device Bays" button at the foot of the application to display the Bay input form.
New bays can be added by entering the next logical bay number into the grid line with the asterisk (*) in the row header and completing the rest of the values.
Descriptions of the fields are as follows:
- Bay-The logical bay number of the bay being modified. Normally this will start at one and follow through to the maximum number of bays for the device.
- Length-The physical length of the bay.
- Bender-The pin bender that can gather input stock from this bay.
- Physical Bay - Normally the same as the Logical bay number but can in circumstances be different (Typically a conveyor).
- Conveyor- Check if the bay is part of a conveyor sub-system.
- Direction- The unloading direction of the bay-Normally North or South.
- Clear-A Temporary flag to inidicate if the bay can be used in optimisation calculations. Setting this to clear means that the bay is clear and can be used for output of cut calculations as required. Setting this as unchecked (not clear) will preclude the bay from being used (ie, there is some work already in the bay that cannot be removed for some reason).
The "Clear All" button will check all the bays and make them available for output.
The "Fill All" button will remove the check from all bays and none of them will be available for output . This is used mainly to "fill" all the bays then "clear" only one or two for output by checking them manually.
No changes are updated until the "Save" button is pressed. Closing the dialog without saving changes will result in a warning message which can be ignored if required.


Simon Gray
Comments