Before you begin
- Ensure you are logged into the Elda (Chrome) Scheduler application. See our article Getting Started with Scheduler for more.
Editing Job Details
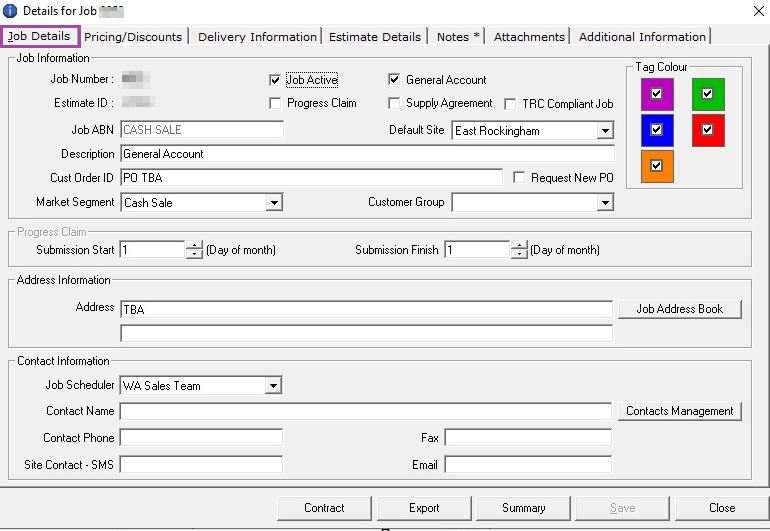
1. In Scheduler, select the customer and job account you wish to edit. See our article Finding a Customer for instructions on using the Find Customer Window to look up customer accounts.
2. With the job number selected in the Scheduler main window, press the Job button.

From the pop-up menu, select Job Details.
3. Make changes to job information in the Job Details tab if required.
- See our article Using Job Address Book for instructions on how to add/set job addresses.
- See our article Contacts Management for instructions on using the Contacts Management to add/set job contacts.
Job Information Field Breakdown
|
Job Options
|
Description of Options
|
| Job Number |
System identification of a Job. |
| Job Active |
Activity status of job in system. |
| General Account |
General Account designate if a job is connected to a project or period supply or if it is for general sales for a large builder. |
| Estimate ID |
If a job was raised from an estimate then the estimate identification number will be here. |
| Progress Claim |
If a job is subject to a progress claim then this is noted here. This is for identification and for reporting purposes. It can be used for automation in future development. |
| Supply Agreement |
If a job is subject to a supply agreement then this is noted here. This is for identification and for reporting purposes. It can be used for automation in future development. |
| TRC Compliant Job |
|
| Job ABN |
|
| Default Site |
|
| Description |
|
| Cust Order ID |
|
| Request New PO |
|
| Market Segment |
|
| Customer Group |
4. Make changes to the jobs default pricing and discounts in the Pricing/Discounts tab if required.

- See our article Assigning Job Account Pricing & Discounts to set specific pricing and discounts if required.
- See our article Job Service Rates for instructions on setting job service rates.
5. Make changes to the jobs delivery information in the Delivery Information tab if required.

Delivery Charge
Delivery Charge can be set by the following methods:
|
Delivery Charge Options
|
Description of Options
|
| List Rate |
Defaults to your organisation's standard delivery charge. |
| Set Amount |
A fixed rate can be charged for all deliveries, as set in the Default Delivery Charge field. This can be overridden on the schedules if required. |
| Price Matrix |
You can setup a custom Delivery Price Matrix based on the postcode of each drop site. |
| Weight Break |
A fixed rate can be charged up to a predetermined weight, then an additional charge is added for each additional increment of weight. |
| Truck Type |
Delivery can be charged by the size and type of truck. (Not available on all implementations). |
Delivery Defaults
You can set the schedule delivery defaults here for the job. Each of the below parameters has the potential to be overridden in the schedule, so long as the schedule has permissions to do so.
- Deliveries Ex-Works - Will default the delivery to ex-works for customer collection.
-
Delivery Types - Allows you to set a default for the Delivery Status Types.
Delivery StatusDescription of StatusConfirmed Delivery Date Delivery Date/Time Confirmed and Set in the system. Production can proceed to meet the set delivery date. Hold Ready Delivery Date/Time needs to be confirmed, but production should proceed and product is then held until confirmed. To Be Confirmed Delivery Date/Time needs to be confirmed, but production should NOT proceed until confirmation is received. To Be Advised Delivery Date/Time has yet to be advised by the customer. Production should NOT proceed until confirmation is received.
Please note: No materials are reserved until manifested and only consumed on scanning.
- Truck Type - Sets the default Truck Type expected for a job. The truck types will be preset for your organization.
- Delivery Date Leeway - Sets the default number of days prior to delivery that the customer can make changes to the order via the Thimbl Online Portal.
- Job Offloading - Sets the default offloading method for the job. This can be overridden when setting up the job site delivery addresses.
- Notify to Not Drop Gluts on Delivery - Ticking this checkbox will default the schedule Delivery Details to notify drivers not to drop off dunnage (Gluts, Slings, etc) to site with the delivery.
- Default Delivery Notes - Will add job specific delivery notes to manifests and delivery dockets. Can be overridden by the job site delivery notes and/or schedule specific delivery notes.
Please note: Once the job is in progress, changing the Default Delivery Notes and clicking Update Schedules will only update the delivery notes on undelivered schedules.
6. Add notes and attachments to the Notes and Attachments tabs, respectively if required. Any notes added into the Internal Scheduling Notes will be displayed within the bottom section of the internal display.

Internal Scheduling Notes Display on the Scheduler Interface:

Attachments can be dropped and dragged into the field within the Attachments tab to be attached to the job account.

7. Make changes to the jobs information in the Additional Information tab if required. Here, you can update the Drawing Field Extra Captions, the Additional Info Print Settings, Consumables, and Tag Printer Modifiers.
- For more information on how to manage the consumables in Scheduler, kindly check the article How to Manage Consumables in Scheduler
8. Press the Save button to save the changes you made to the job and close the window.
![]()


Simon Gray
Comments